
 Sale
Maple Leaf Intarsia Pattern
Original price was: $20.00.$9.99Current price is: $9.99.
Create autumn wood art with the Maple Leaf Intarsia Pattern. Get an 18-page PDF guide with sizing, tracing grids, wood selection and assembly tips.
Digital ProductNo physical shipping
Secure CheckoutProcessed by WooCommerce
Workshop ReadyReview product details below
About this pattern
Pattern Description
Read the complete product information before purchasing.
Capture the warm beauty of autumn with this Maple Leaf Intarsia Pattern, a digital scroll saw woodworking project featuring a beautifully detailed maple leaf made from individually fitted wooden segments.
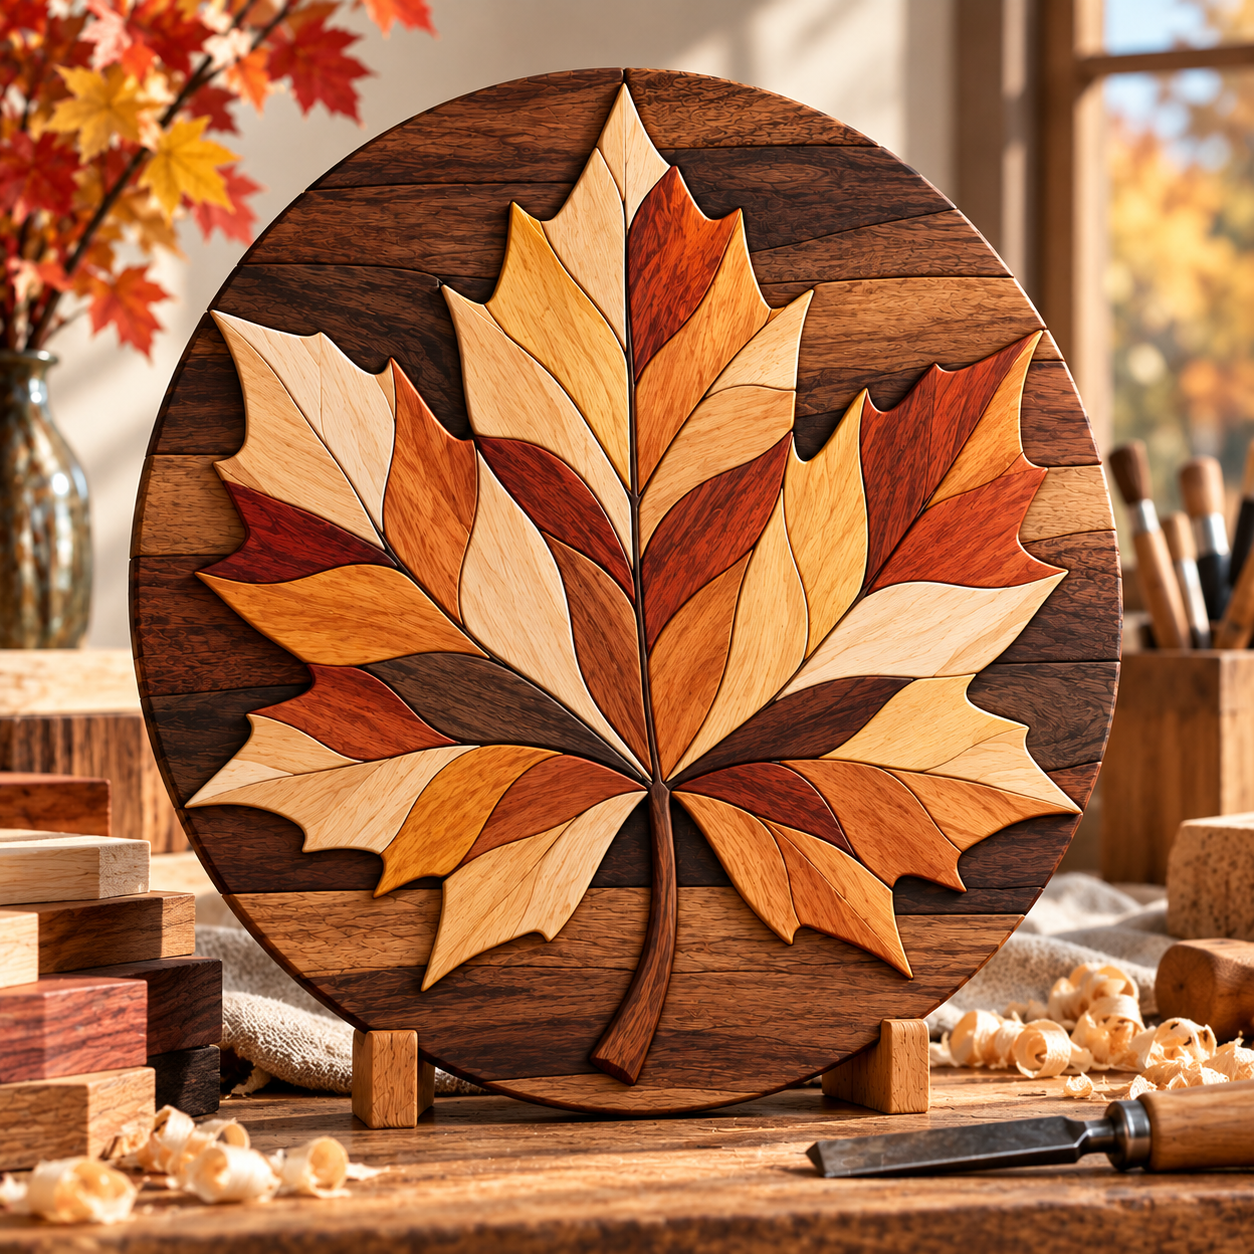
Inspired by the rich colors of fall, this design combines golden yellow, warm amber, deep orange, rustic red, cream, and dark walnut tones to create a striking piece of dimensional wooden artwork.
The maple leaf sits against a circular, walnut-toned background with horizontal wood-grain details, creating a beautiful contrast between the colorful leaf and its natural wooden surroundings.
Unlike ordinary flat wooden decorations, this intarsia pattern uses individually cut, fitted, and gently shaped wooden components to create depth, texture, and visual interest.
Whether you enjoy intarsia woodworking, seasonal scroll saw projects, or creating handmade rustic home decorations, this design offers an enjoyable opportunity to develop your skills.
The digital product includes a detailed 18-page beginner-oriented woodworking guide covering wood selection, sizing, pattern tracing, cutting, shaping, assembly, and finishing.
If you are new to dimensional woodworking, explore our Intarsia for Beginners guide before starting your project.
Maple Leaf Intarsia Pattern for Autumn Woodworking
This beautiful maple leaf design features a recognizable five-lobed silhouette with carefully arranged internal wood-color sections.
The leaf includes pale cream highlights, golden yellow areas, rich orange segments, reddish-brown accents, and contrasting walnut-colored details.
A long central vein runs through the design, connecting the individual leaf sections to the narrow wooden stem below.
The carefully arranged components create the appearance of a natural autumn maple leaf while highlighting the distinctive textures of real wood grain.
The circular background complements the composition with dark, horizontally arranged wooden bands.
Its warm autumn palette makes the completed project an attractive decoration for rustic interiors, farmhouse homes, seasonal displays, and nature-inspired living spaces.
What Makes This Maple Leaf Intarsia Pattern Special?
One of the most attractive features of this project is its detailed segmented construction.
Instead of cutting the maple leaf from one solid piece of wood, the design uses separate wooden components to create natural variations in color.
Each section can be selected according to its wood tone, grain direction, and position within the overall composition.
Gentle surface shaping helps the individual pieces appear slightly raised, creating a dimensional effect without losing the recognizable maple leaf silhouette.
The contrasting colors provide a beautiful representation of autumn foliage.
Woodworkers can create their own interpretation using naturally colored woods or carefully selected wood-safe stains.
Because every board has its own grain pattern, each completed project can have a distinctive appearance.
Learn more about how this technique works in our What Is Intarsia? guide.
Maple Leaf Intarsia Pattern Size and Resizing
The recommended starting size for this project is approximately 400 mm (15.7 inches) in diameter.
This size provides practical working space for cutting and shaping the individual wooden sections while preserving the detailed maple leaf design.
The included guide explains how to resize the artwork proportionally to suit different display requirements.
For example, a 250 mm (9.8-inch) version can create a smaller decorative project, while a 500 mm (19.7-inch) version can become a more prominent piece of wall art.
A larger 600 mm (23.6-inch) version may be suitable for a statement woodworking project when supported by an appropriately constructed backing panel.
When resizing, the complete design must maintain consistent proportions so the maple leaf remains balanced and recognizable.
The guide includes 10 × 10 and 20 × 20 reference grids to assist with proportional tracing and layout preparation.
These reference grids help you develop a full-size paper master for cutting and assembly.
Choosing Wood for Your Maple Leaf Intarsia Pattern
The combination of wood colors is an important part of the finished design.
Pale maple, holly, or birch can provide attractive light-colored sections.
Ash, oak, and lighter birch tones can help create golden and honey-colored areas.
Cherry and other warm-toned woods are useful for orange and copper-colored segments.
Walnut provides beautiful dark brown contrast and can also be used for the central vein, stem, and circular background.
For deeper reddish sections, appropriately colored hardwoods or compatible stains can help achieve the desired appearance.
The background can be constructed using a stable wooden panel with walnut-toned veneer or other suitable decorative wood.
Before cutting, arrange your selected boards together to compare their colors and grain patterns.
A balanced combination of light, medium, and dark tones helps the individual leaf segments remain clearly visible.
Maple Leaf Intarsia Pattern Cutting and Grain Direction Tips
A scroll saw is commonly used for cutting the individual wooden components.
Begin by preparing a full-size tracing master and identifying the separate color sections.
Number each component and mark the intended wood-grain direction before transferring the design onto your chosen material.
For pointed leaf segments, grain direction should generally follow the length of the piece whenever practical.
This helps preserve delicate tips and gives the completed leaf a more natural appearance.
Use an appropriately selected scroll saw blade and work carefully around narrow points and tight corners.
After cutting, gradually shape the exposed surfaces using suitable sanding tools.
Maintain accurate fitting edges while gently rounding the upper faces to create the desired dimensional effect.
Dry-fit neighboring components frequently to check alignment before permanent assembly.
Detailed 18-Page Beginner Woodworking Guide Included
The accompanying digital guide explains the construction process in clear, organized stages.
It begins with an overview of the maple leaf design and its individual components.
The guide then explains how to select suitable woods, plan the finished diameter, resize the design, and prepare a full-size tracing master.
Additional sections cover scroll saw cutting, surface shaping, grain direction, circular backing preparation, assembly order, gluing, sanding, finishing, and display preparation.
The included diagrams demonstrate how the individual wooden segments fit together and how gentle surface rounding creates dimensional relief.
The reference-grid pages help woodworkers understand the location of the internal color sections, leaf tips, central vein, and outer silhouette.
A troubleshooting section discusses common issues such as visible gaps, chipped leaf tips, uneven surface heights, incorrect wood colors, and problems with the circular backing.
This makes the guide useful for beginners who want to improve their woodworking skills while working through a detailed seasonal design.
Assembly, Finishing, and Display Ideas
Begin assembly by preparing a stable circular backing panel.
Position the central vein and stem according to the master layout, followed by the individual maple leaf sections.
Check the complete design before applying glue.
Once the pieces fit correctly, assemble them carefully using a suitable wood adhesive and allow the required curing time.
After final sanding, apply a compatible protective finish according to the manufacturer’s instructions.
A matte or satin clear coat can enhance the natural appearance of the wood without creating excessive shine.
When the completed artwork is dry, mount it using properly rated hanging hardware or display it on a stable wooden stand.
The finished maple leaf can make an attractive decoration for living rooms, entryways, home offices, cabins, and seasonal autumn displays.
Its warm colors also make it a thoughtful woodworking project for Thanksgiving decorations, housewarming gifts, and handmade fall-inspired home accessories.
Create Beautiful Autumn Wood Art
The Maple Leaf Intarsia Pattern offers a creative way to combine scroll saw woodworking with the natural beauty of fall foliage.
From selecting complementary wood colors to fitting and shaping each individual segment, the construction process encourages creativity, patience, and attention to detail.
The completed design can become a beautiful reminder of autumn’s warmth and color.
This is a digital woodworking product, not a finished wooden decoration. Wood, tools, adhesive, finishes, and other physical materials are not included.
The PDF provides reference images, tracing grids, and instructions for preparing your own full-size cutting master.
Explore more projects in our Intarsia Patterns Shop and discover additional nature-inspired woodworking designs.
Before using or distributing your downloaded files, please review our Digital Product License for the applicable usage terms.
Create something memorable with the Maple Leaf Intarsia Pattern and bring the timeless beauty of handmade autumn wood art into your next woodworking project.
Simple purchase flow
From Pattern to Workshop
01
Choose Your Pattern
Review the product details, images and specifications.
02
Checkout Securely
Use the Card or PayPal purchase button to open the secure checkout for this pattern.
03
Access Your Purchase
Follow the instructions shown after successful payment to access your digital purchase.
04
Start Creating
Prepare your wood and begin your intarsia project.