
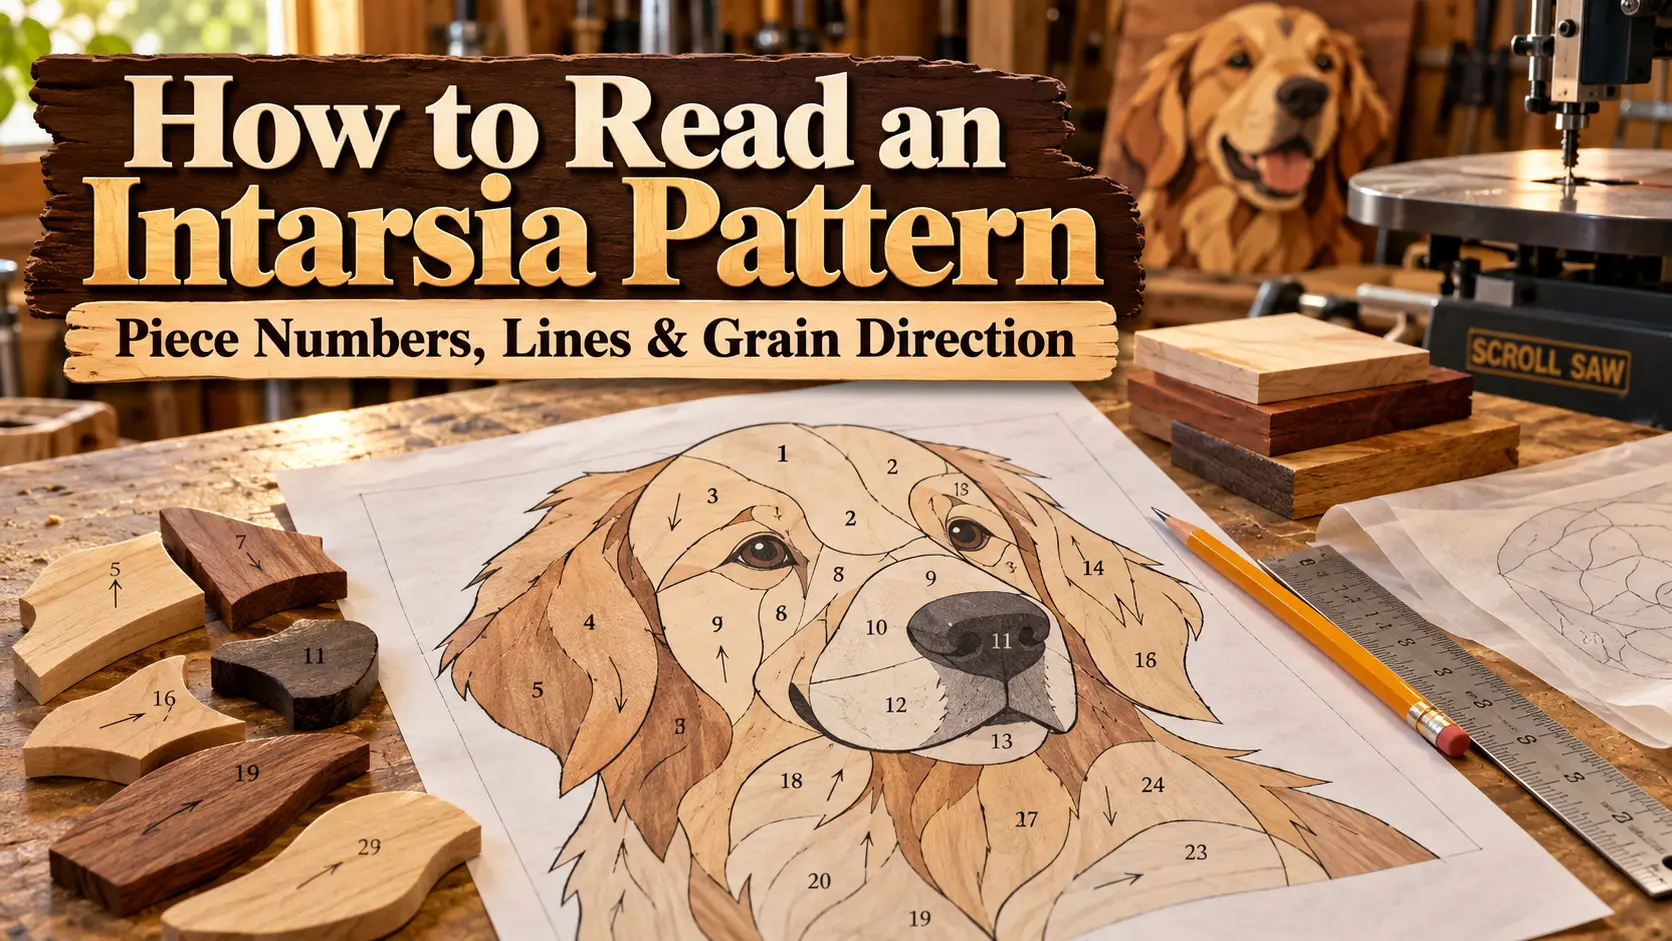
Learning how to read an intarsia pattern is one of the first skills that makes intarsia woodworking feel much easier.
At first, an intarsia pattern can look like a puzzle filled with curved lines, numbers, arrows and small notes. Once you understand what those marks are telling you, the pattern becomes a map for choosing wood, cutting pieces and assembling the finished design.
An intarsia pattern does more than show the outline of an animal, bird, flower or scene. It can also tell you where individual pieces separate, how the wood grain should run, which pieces belong together and how the completed project should look.
This guide explains each part in simple language so you can study a pattern before making your first cut.
If you are completely new to the craft, first read our Intarsia for Beginners guide for an overview of the complete woodworking process.
How to Read an Intarsia Pattern Before You Start Cutting
The easiest way to read an intarsia pattern is to study the entire design before cutting individual pieces.
Start with the finished shape. Then identify the piece boundaries, numbers, grain arrows, wood or shade codes and any special notes supplied with the pattern.
Do not immediately cut the pattern into separate pieces.
Keep one complete copy as your master pattern whenever possible. The master gives you a reference showing where every individual piece belongs after cutting and shaping.
Traditional intarsia instructions often recommend keeping a full master while using additional copies for individual pattern parts. Intarsia.com specifically describes keeping one pattern as a master and cutting other copies according to changes in color or grain direction.
A useful reading order is:
- Study the finished reference.
- Check the overall size.
- Find the pattern legend or notes.
- Identify individual piece boundaries.
- Follow the piece numbers.
- Check grain direction.
- Review wood colors or shade codes.
- Check special shaping or assembly marks.
- Compare everything with the master pattern.
This five-minute review can prevent many mistakes later.
What Is an Intarsia Pattern?
An intarsia pattern is a template that divides a finished woodworking design into individual wooden sections.
Imagine a picture of a fox made from many separate shapes. The ears may be several pieces, the face may contain different sections, and the chest may be divided according to color or fur direction.
Each shape is cut separately from wood and then shaped, sanded and fitted with neighboring pieces.
The natural color and grain of the wood become part of the artwork.
That is why reading an intarsia pattern requires more than simply following an outside outline.
If you want a deeper explanation of the technique itself, visit What Is Intarsia?.
Understanding Piece Numbers on an Intarsia Pattern
Piece numbers help you keep track of the many individual parts that form the finished project.
A simple pattern may contain only a small number of pieces. A detailed wildlife design can contain many more.
How Piece Numbers Work
A designer may label pieces:
1, 2, 3, 4…
or use another numbering or lettering system.
The exact system is less important than consistency.
Piece number 12 on your loose template should still be recognizable as piece 12 when it reaches your wood, sanding area and assembly table.
Numbering becomes especially important when several shapes look nearly identical.
For example, two small feather pieces may appear almost the same until you compare them with their position on the master pattern.
Never Remove the Piece Number Too Early
Keep the number visible while cutting and shaping whenever practical.
You can write the number again lightly on the back of the wooden piece before removing the paper template.
This gives you a simple identification system throughout the project.
A useful workflow is:
Pattern piece → Wood blank → Cut piece → Shaped piece → Master layout.
The same number should follow the piece through every stage.
How to Organize Numbered Intarsia Pattern Pieces
For larger projects, create small groups.
You might separate pieces into areas such as:
- head
- body
- wing
- tail
- background
- foreground
This is easier than keeping 40 or 60 loose pieces in one pile.
A shallow tray, divided box or labeled container can save a surprising amount of time.
How to Read Lines on an Intarsia Pattern
Lines are where beginners can easily become confused.
Not every line necessarily means the same thing.
The most important rule is simple: check the pattern legend or instructions before assuming what a line represents.
There is no reason to assume every designer uses exactly the same symbol system.
Intarsia Pattern Piece Boundary Lines
The main solid outlines usually define the shapes that will become individual wooden pieces.
Where two neighboring pieces meet, both pieces must eventually fit closely together.
That shared edge matters.
If you accidentally reshape it too aggressively before checking the fit, a noticeable gap may appear during assembly.
For that reason, think of a boundary line as more than a cutting guide. It also represents a future joint with another piece.
Internal Detail Lines
Some designs contain lines that show visual detail rather than separate pieces.
For example, an animal pattern might show:
- facial detail
- feather direction
- fur separation
- shaping references
- texture
- decorative marks
Do not automatically cut every visible line.
Look at the pattern instructions, legend and finished reference first.
This is one of the reasons a finished-project image is so useful.
Dashed or Special Lines
Dashed lines, dotted lines and other special marks can mean different things depending on the designer.
They may indicate shaping, positioning, overlap, hidden details or another construction note.
Never create a universal rule such as “every dashed line means X.”
Instead, ask:
Does the pattern provide a legend explaining this mark?
If yes, follow that legend.
If not, compare the mark with the finished image and neighboring parts before cutting.
H4: How to Read an Intarsia Pattern Line When You Are Unsure
If a line is unclear, stop before making the cut.
Check these four things:
- Does the line reach the outside edge of the piece?
- Does the neighboring area have its own piece number?
- Is there a grain arrow or wood code on both sides?
- Does the finished reference show two separate pieces?
If several clues suggest separation, it may be a piece boundary.
If the line only represents surface detail, cutting it could unnecessarily divide one piece into two.
When the pattern includes specific instructions, those instructions should take priority.
Grain Direction: One of the Most Important Parts of an Intarsia Pattern
Grain direction affects both the appearance and behavior of a wooden piece.
On many patterns, grain direction is shown with an arrow.
That arrow tells you how the template should be oriented relative to the grain of your chosen board.
Grain direction is particularly important in intarsia because the grain acts almost like brush strokes in a painting.
How to Follow a Grain Direction Arrow
Suppose an arrow runs from the bottom of a fox’s neck toward its head.
When placing that pattern section on the wood, rotate it until the visible grain follows approximately the same direction as the arrow.
Then attach or trace your template.
Do this before cutting.
After the piece has been cut, you cannot rotate the grain within the wood.
Grain Direction for Animal Intarsia Patterns
For animals, think about how fur naturally grows.
The grain can often follow that movement.
On a body section, the grain may flow along the body.
Around the face, it may change direction from one pattern piece to another.
This allows neighboring pieces to create visual separation even when their wood colors are similar.
Wildlife-intarsia guidance commonly recommends using grain direction to follow fur or feather flow.
Grain Direction for Bird Intarsia Patterns
Bird projects can benefit greatly from careful grain placement.
Think about the direction of feathers.
Wing pieces can use grain that flows toward the feather tips, while chest sections may use another orientation.
You are not simply filling a shape with wood.
You are using the grain to reinforce the subject.
Grain Direction for Trees, Water and Landscape Elements
The same idea works outside animal designs.
A tree trunk generally looks natural with grain following its vertical growth.
Water can benefit from horizontal or flowing grain.
Mountain and rock pieces may use grain changes to create natural variation.
There is room for artistic choice, but the pattern arrow gives you the designer’s intended direction.
What Do Letters and Shade Codes Mean on an Intarsia Pattern?
Some patterns use letters or abbreviations to suggest wood species, wood color or tonal value.
For example, a pattern system might identify areas as:
L = Light
M = Medium
MD = Medium Dark
D = Dark
These labels help preserve contrast between neighboring pieces.
Intarsia.com discusses light, medium-light, medium-dark and dark values as relative tones within an individual project rather than absolute colors.
That distinction matters.
A piece labeled “dark” does not necessarily mean you must use the darkest wood species you can find.
It means the piece should usually read darker compared with nearby pieces.
Do You Have to Use the Exact Suggested Wood?
Not always.
Some patterns provide wood-species suggestions rather than strict requirements.
Woodcraft has published intarsia examples in which pattern pieces use both grain arrows and letters for suggested wood, while noting that makers can choose other species to achieve the desired color.
The important visual questions are:
Does the replacement wood provide the correct tone?
Does its grain fit the direction shown?
Will it create enough contrast against neighboring pieces?
Those questions are often more useful than simply matching a species name.
How to Use the Finished Reference With Your Intarsia Pattern
Do not ignore the finished reference image.
It can help you understand information that is difficult to communicate with lines alone.
Compare the reference with your pattern and look at:
- light and dark areas
- raised and recessed sections
- rounded edges
- grain flow
- piece transitions
- foreground and background relationships
- overall silhouette
A line drawing tells you where pieces are located.
A finished reference helps explain why those pieces were designed that way.
Use both.
Keep a Master Intarsia Pattern
One of the easiest ways to become confused during assembly is to cut your only full pattern into dozens of individual pieces.
Instead, keep a master.
The master pattern becomes your map.
As you finish each wooden part, place it back over or beside its original position on the master.
This lets you quickly see:
- which piece comes next
- whether a piece is upside down
- where similar pieces belong
- whether something is missing
- whether neighboring parts fit correctly
For a detailed pattern, this is far easier than assembling from memory.
How to Read an Intarsia Pattern Before Choosing Wood
Do not choose all your wood before understanding the design.
First identify the major tone groups.
Ask yourself:
Where are the lightest sections?
Where are the darkest?
Which neighboring pieces need contrast?
Which pieces rely heavily on grain direction?
Which areas are large enough to show dramatic figure?
Only after answering those questions should you start laying templates on boards.
This approach can also reduce wasted wood because you are selecting each board for a purpose.
Check Neighboring Pieces, Not Just Individual Pieces
An intarsia project is a connected system.
A perfectly shaped piece can still be wrong if it does not fit its neighbors.
When reading the pattern, pay attention to shared edges.
If piece 18 touches pieces 17, 19 and 24, then its final shape affects all three connections.
That is why the master pattern remains useful throughout cutting and fitting.
You are building a wooden puzzle, not a collection of unrelated shapes.
Common Mistakes When Reading an Intarsia Pattern
Understanding a few common mistakes can prevent wasted wood.
Mistake 1: Cutting Every Line
Some lines may show details rather than piece boundaries.
Read the legend first.
Mistake 2: Ignoring Grain Arrows
The shape may still fit, but the finished artwork can look less natural when grain direction works against the subject.
Mistake 3: Losing Piece Numbers
Several similar pieces become surprisingly difficult to identify once their paper labels disappear.
Mark the back before removing the template.
Mistake 4: Cutting Up the Only Master Copy
Always preserve a complete reference when the pattern format permits it.
Mistake 5: Choosing Wood Only by Color
A beautiful piece of wood can still be unsuitable if its grain direction fights the design.
Evaluate color and grain together.
Mistake 6: Assuming Every Pattern Uses the Same Symbols
Different designers may use different conventions.
Always read the instructions supplied with the specific pattern you are using.
H3: How to Read an Intarsia Pattern With No Clear Legend
Occasionally, you may work with a pattern that has minimal instructions.
Do not start guessing immediately.
Begin by identifying the information you can confirm.
Piece numbers usually tell you the separate components.
Repeating arrows likely relate to orientation or grain.
Letters repeated across groups may represent wood or tonal categories.
But treat these as clues, not universal definitions.
Compare the pattern with its finished reference and any instructions supplied by the designer.
If a symbol could affect whether you cut a piece apart, confirm its meaning before cutting.
That habit is much cheaper than replacing wood later.
H4: How to Read an Intarsia Pattern With Confidence Before the First Cut
Before switching on your scroll saw, perform this final check.
You should be able to answer:
- What is the finished project supposed to look like?
- What is its intended size?
- Where does each major piece belong?
- Which lines are cutting boundaries?
- Which marks are only details?
- What do the numbers mean?
- What do the arrows mean?
- Which grain direction does each major piece require?
- Are there wood or tone codes?
- Did you preserve a master copy?
- Can you identify every piece after removing its paper template?
If you cannot answer one of those questions, spend another few minutes studying the pattern.
Reading first usually takes less time than correcting a mistake.
A Simple Intarsia Pattern Workflow
Once you understand the pattern, use a consistent workflow.
Step 1: Study the Complete Pattern
Read all notes before separating pieces.
Step 2: Keep a Master Copy
Use it as your assembly map.
Step 3: Identify Piece Numbers
Make sure every wooden component can remain identifiable.
Step 4: Read Grain Arrows
Orient each template before attaching it to your wood.
Step 5: Check Wood and Shade Codes
Plan enough contrast between neighboring pieces.
Step 6: Separate Pattern Pieces Carefully
Avoid accidentally removing information you still need.
Step 7: Lay Pieces on the Wood
Think about grain, figure, color and efficient use of stock.
Step 8: Cut and Check Fit
Compare neighboring sections before heavy shaping.
Step 9: Return Pieces to the Master
Keeping the project organized makes later assembly much easier.
Why Learning How to Read an Intarsia Pattern Improves the Finished Project
Good intarsia begins before the blade touches the wood.
When you understand piece numbers, lines, grain arrows and tone codes, you make better decisions throughout the project.
You know which shapes connect.
You understand why a piece faces a certain direction.
You can choose wood based on both color and grain.
Most importantly, you spend less time wondering where everything belongs.
Patterns are not just outlines to cut around. They carry information about how the final artwork is meant to come together.
Once you learn to read that information, even a complicated design begins to look much more manageable.
Ready to put these skills into practice? Explore the IntarsiaPattern shop to browse digital intarsia pattern designs, or continue with our Intarsia for Beginners guide before starting your first project.
Frequently Asked Questions About How to Read an Intarsia Pattern
What do the numbers on an intarsia pattern mean?
Numbers normally identify individual pieces and help you return them to the correct location during fitting and assembly. The exact numbering system can vary by designer, so always check the instructions included with your pattern.
What do arrows on an intarsia pattern mean?
Arrows commonly indicate the intended wood grain direction. Position the template so the board’s grain follows the indicated direction before cutting.
Does every line on an intarsia pattern need to be cut?
No. Some lines may indicate details, shaping information or other references rather than separate pieces. Check the pattern legend or instructions before cutting.
Why is grain direction important in intarsia?
Grain direction influences the visual flow of the finished project and can help represent fur, feathers, water, wood, plants and other natural forms. It can also affect the strength of narrow pieces.
Should I keep a complete copy of my intarsia pattern?
Yes, when the license and supplied format allow it. A complete master copy makes it much easier to identify, organize and assemble individual pieces.
Can I use different wood than the pattern recommends?
Often yes. Suggested woods can usually be substituted when another species provides suitable color, grain and working characteristics. Check any specific instructions supplied with the pattern.
What should I do if I do not understand a pattern symbol?
Check the legend, instructions and finished reference before cutting. Symbol conventions are not guaranteed to be identical across every intarsia pattern designer.

admin
Articles from IntarsiaPattern focus on intarsia woodworking, scroll saw techniques, digital patterns and practical project guidance.
Comments 0
Have a question or something useful to add? Share it below.